8 min read
How to Make a Receipt in Excel
A step-by-step guide to building a reusable receipt in Microsoft Excel, using formulas to total items and tax automatically, with tips for turning it into a template.
- How do I make a receipt in Excel?
- Receipt Caker skips the formula-building entirely and totals everything for you, but if you prefer Microsoft Excel, add a header with your business details, receipt number, and date, then build an item table with description, quantity, unit price, and line total columns. Use a formula like =B8*C8 for each line total, SUM for the subtotal, and a rate multiplication for tax before exporting to PDF.
Lay out the header
Open a blank Microsoft Excel workbook and reserve the top few rows for the header. Put your business name in a large, bold cell, then your address and a contact detail beneath it. To the right, add two labelled cells: one for a unique receipt number and one for the date, which you can type or set with a formula like =TODAY() while you are drafting.
Leaving the header in fixed cells means it stays put every time you reuse the file. Merge cells where you want a title to span the width, and keep a blank row between the header and the item table so the receipt does not look cramped when printed.
Build the item table with formulas
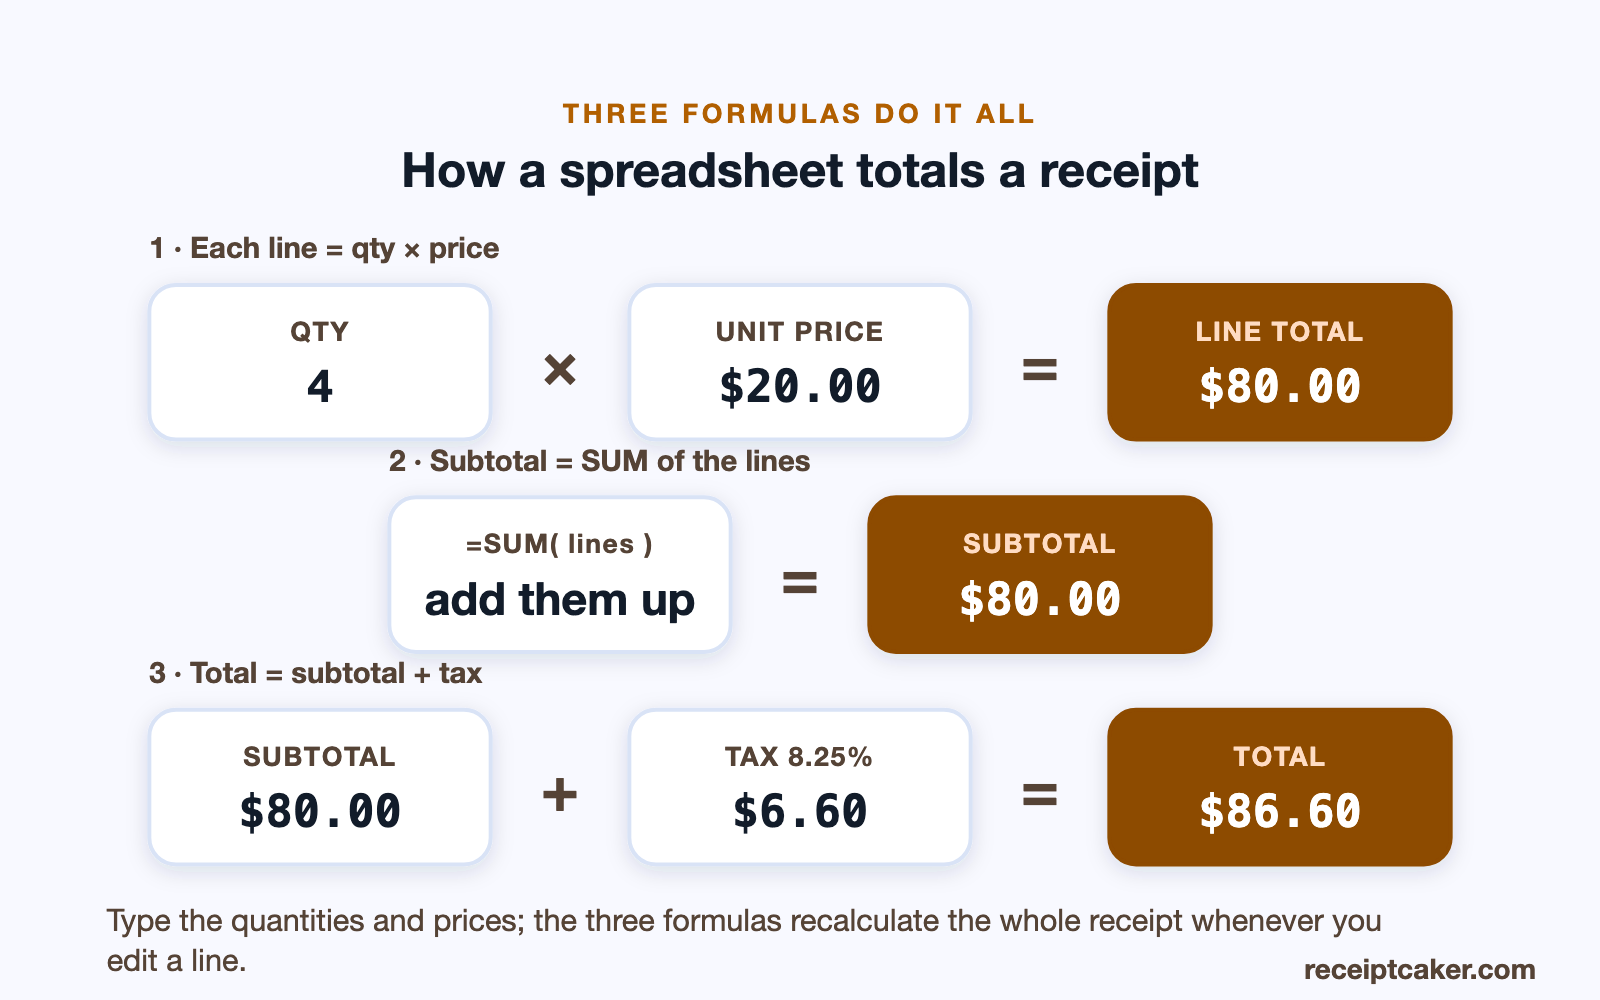
Create a header row for the items with four columns: Description, Quantity, Unit Price, and Line Total. Under it, leave several empty rows for line items. In the first Line Total cell, enter a formula that multiplies quantity by unit price — if quantity is in B8 and unit price in C8, type =B8*C8 — then drag the fill handle down so every row calculates itself.
Using a formula rather than typing totals by hand is the whole point of doing this in a spreadsheet: change a quantity and the line updates instantly, with no arithmetic mistakes. Format the price and total columns as currency so figures line up neatly and always show two decimal places.
Protect the formulas so they don't break
A spreadsheet receipt is only reliable if the formulas survive being reused. The safest setup is to save the file as an Excel template, so opening it produces a fresh copy and your master formulas stay untouched, and to type only into the input cells — description, quantity, unit price — while leaving the formula cells alone. Locking or protecting the formula cells stops an accidental edit from silently changing a total.
Two habits prevent most breakages. Keep the tax rate in a single labelled cell that the tax formula references, so you change it in one place rather than hunting through the sheet. And be careful inserting or deleting rows inside the item table, since that is what most often knocks a SUM range or a cell reference out of alignment. Check the grand total after any structural change.
Discounts and multiple tax rates
Real receipts are not always a single flat calculation. If you give a discount, add it as its own labelled row between the subtotal and the tax, subtracting from the subtotal, so the arithmetic stays visible rather than hidden inside a changed price. Reference that discount cell in the total formula so everything still recalculates.
If you sell items at different tax rates, the cleanest approach is to tax each group on its own line rather than applying one blended rate to the whole subtotal. Put each rate in a labelled cell, calculate the tax for each taxable group separately, and sum the tax lines. It is more setup, but it keeps the receipt accurate and auditable — exactly the kind of fiddly bookkeeping a dedicated generator handles without any formula work at all.
Add subtotal, tax, and total
Below the item table, add three labelled rows. For the subtotal, use =SUM() across the Line Total cells, for example =SUM(D8:D20). For tax, multiply the subtotal cell by your rate as a decimal — if the subtotal is in D22 and the rate is 8.25%, enter =D22*0.0825. For the grand total, add the subtotal and tax cells, such as =D22+D23.
Because each figure references the ones above it, the receipt recalculates end to end whenever you edit an item. If you handle several tax rates, put the rate in its own labelled cell and reference it in the formula so you can change it in one place. Keep tax on its own visible line, since it should never be hidden inside item prices.
Make it look like a receipt, not a spreadsheet
A working spreadsheet and a presentable receipt are not the same thing, so spend a moment on appearance. Turn off the gridlines for printing, add clean cell borders just around the item table, right-align the price and total columns so the decimal points line up, and format those columns as currency so every figure shows two places. Bold the business name and the grand total, and give the header room to breathe.
Then control the page itself. Set the print area to the receipt's cells so stray empty columns are not printed, and use print preview to confirm the whole thing fits on one page without a column spilling onto a second sheet. A receipt that prints clipped or across two pages looks unprofessional and is harder for a customer to file.
Numbering and reusing the file
Because you will issue many receipts from the same sheet, give each one a unique number and keep them in sequence, so you can spot a missing one and tie each receipt to its entry in your books. Type the number into its input cell for every sale rather than baking a fixed one into the template, which would silently repeat on the next receipt.
Reuse the file by opening a fresh copy of the template for each sale and filling only the input cells — the header and the formulas carry over untouched. Save each finished receipt under its own name, ideally by number and date, and export it to PDF so your records build up as a folder of fixed documents rather than one spreadsheet you keep overwriting.
Format, save as a template, and export
Tidy the layout with cell borders around the item table, bold labels for the totals, and consistent currency formatting. Set the print area so the receipt fits a single page, and preview it to confirm nothing is clipped. When it looks right, save the file as an Excel template so opening it produces a fresh, blank receipt each time rather than overwriting the last one.
To send a receipt, export or print it to PDF so the customer receives a fixed, tidy document rather than an editable spreadsheet. Excel is capable but fiddly to maintain, and a stray edit can break a formula. If you would rather not manage that, Receipt Caker gives you the same itemized layout with automatic totals and a clean PDF or image export, no formulas required.
Les étapes en un coup d'œil
- 1Set up the header block. Add your business name, address, and contact in the top rows, then cells for the receipt number and date.
- 2Build the item table. Create columns for description, quantity, unit price, and line total across a header row.
- 3Add the line-total formula. In the line total column, multiply quantity by unit price, for example =B8*C8, and fill it down the rows.
- 4Total the subtotal, tax, and grand total. Use SUM for the subtotal, multiply it by your tax rate for the tax line, then add the two for the total.
- 5Format and save as a template. Apply currency formatting and borders, then save the file as an Excel template so each new receipt starts blank.