7 min read
How to Issue a Refund Receipt
A step-by-step guide to issuing a refund receipt that documents money returned to a customer, references the original sale, and keeps your records accurate.
- How do I issue a refund receipt?
- Receipt Caker lets you build a clear refund receipt that mirrors the original sale and exports as a PDF. To issue one, reference the original sale, itemize the goods being refunded, show the refunded total with the tax reversed, and record how and when the money was returned. Give it its own number and file it with the original so both parties have a documented record.
What a refund receipt records
A refund receipt documents money returned to a customer for a completed sale — a returned product, a cancelled service, or an overcharge being corrected. It is the mirror image of a normal receipt: instead of recording money coming in, it records money going back out, and it gives the customer proof that the refund was made.
Issuing a proper refund receipt protects both sides. The customer has evidence the money was returned if their bank statement is slow to update, and you have a record that explains why your day's takings are lower than your gross sales. Without it, a refund is just an unexplained dip in your figures.
Tie it to the original sale
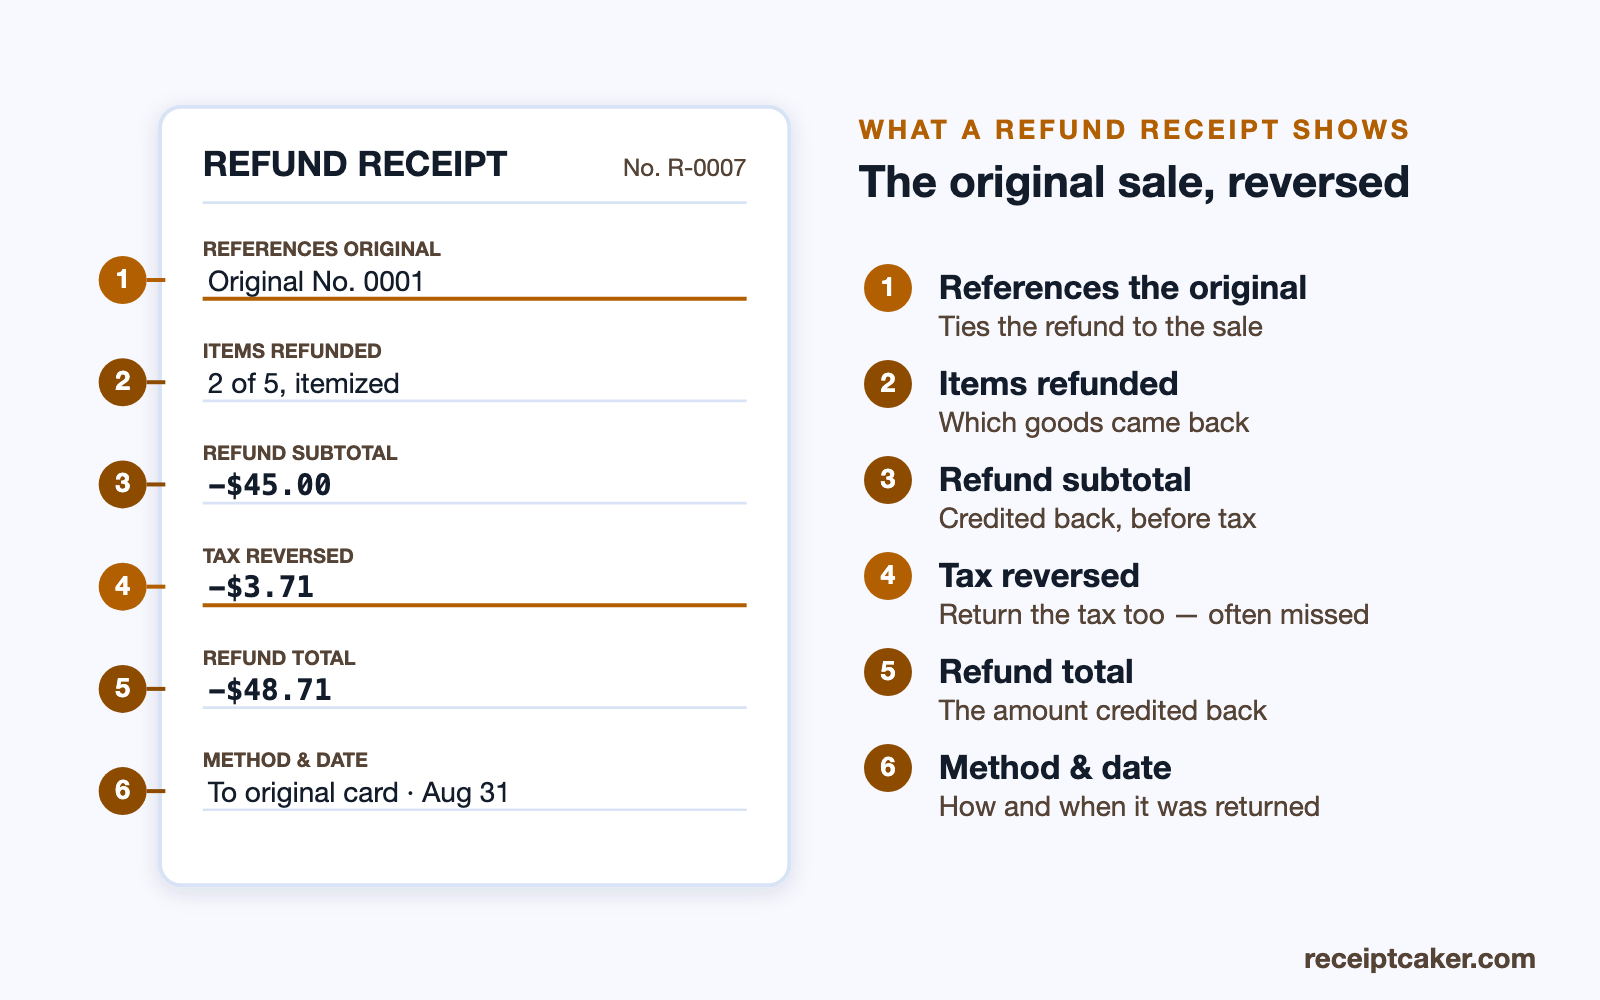
A refund does not stand alone; it reverses a specific earlier purchase, so the refund receipt should reference the original. Note the original receipt's number and date, and itemize which goods or services are being refunded rather than lumping the amount into a single line. This makes it clear that you are returning money for identified items from a real, prior transaction.
Itemizing also handles partial refunds cleanly. If a customer keeps three items from a five-item order and returns two, the refund receipt lists exactly those two and their prices, so both parties can see that the remaining goods were kept and paid for. Referencing the original keeps the whole story straight.
Full refunds, partial refunds and exchanges
Not every return is all-or-nothing, so the receipt should match what actually happened. A full refund reverses the entire sale, mirroring the original receipt line for line with the amounts credited back. A partial refund reverses only some of it — the two items returned out of five — and lists exactly those, leaving the kept goods clearly paid for. Getting this right is what stops a customer being over- or under-refunded.
An exchange is a refund and a new sale stitched together: you refund the returned item and ring up its replacement, and the paperwork is cleanest when it shows both halves rather than just the price difference. Where store credit is offered instead of money back, the refund receipt should say so plainly, since credit and a cash refund are not the same thing to either your books or the customer.
What the refund does to your books
A refund is not just a customer-service act; it moves numbers in your accounts, and the receipt is what explains the movement. Because money goes back out, your day's takings end up lower than your gross sales, and the refund receipt is the record that accounts for the difference — without it, that dip looks like a hole rather than a documented return.
The reversed tax matters here too. When you refund a taxed item you hand back the tax charged on it, and recording that keeps your tax records accurate, since you should not remit tax on a sale that was undone. File the refund receipt alongside the original so the sale and its reversal sit together, and your books reconcile cleanly against the money that actually stayed in the till.
Handle the tax and the total
When you refund an item, you generally refund the tax that was charged on it too. Reverse the tax proportionally to the goods being returned and show it on the refund receipt, so the customer gets back exactly what they paid and your tax records stay accurate. Skipping this leaves you having remitted tax on a sale that was partly undone.
Present the refund figures clearly as amounts being returned — negative lines, or a labelled refund total — so no one mistakes the document for a new charge. The refunded total plus its reversed tax should match the portion of the original sale being reversed, which is easy to verify when you have referenced that original receipt.
Refund policies and timing
A refund receipt records a decision your return policy has already shaped, so the two work together. Whether a return is inside the window, whether the goods came back in acceptable condition, and whether a restocking fee applies are policy questions; once they are settled, the receipt documents the outcome — the amount actually refunded, after any deduction, and why. Noting a restocking fee or a partial deduction on the receipt keeps the figure transparent rather than leaving the customer guessing why they got back less than they paid.
Timing is worth capturing too. A refund to a card can take days to appear on the customer's statement, so a dated receipt issued at the moment you process it reassures them the money is on its way and gives you a record of when you sent it. If a refund is delayed or conditional, say so on the receipt, so expectations are set in writing rather than over the counter.
Proof against a later dispute
A refund receipt is also your protection if the transaction is questioned afterward. If a customer forgets the refund landed and files a card chargeback, or claims they were never refunded, the dated receipt showing the amount returned and the method is the evidence that closes the matter. Handing the customer a copy at the time makes such disputes far less likely in the first place.
For your own side, the filed refund receipt is what lets you show, months later, that a dip in a day's takings was a documented, legitimate return rather than a discrepancy. Kept with the original sale, the pair tells a complete, defensible story — money in, then part or all of it back out, each step accounted for.
Record the method, issue, and file
State how the money was returned — back to the original card, in cash, or as store credit — and the date, since customers and auditors both care about the route the refund took. Refunding to the original payment method is the cleanest approach and is often expected. Give the refund receipt its own unique number so it slots into your sequence.
Finally, file the refund receipt with the original sale so the two sit together in your records, and hand or send the customer a copy as their proof. Receipt Caker makes this straightforward: mirror the original items, mark the amounts as refunded, add the reversed tax, and export a clean PDF that both you and the customer can keep for a fully documented return.
Los pasos de un vistazo
- 1Reference the original sale. Pull up the original receipt and note its number and date so the refund is tied to the purchase it reverses.
- 2List the refunded items. Show which items or services are being refunded, with the amount for each, so the refund is itemized.
- 3Show the refund total and tax. Total the refunded amounts and reverse the proportional tax, displaying the refund as a clearly negative or credited figure.
- 4Record the refund method. Note how the money was returned — to the original card, in cash, or as store credit — and the date.
- 5Issue and file the receipt. Give the refund receipt a unique number, export it as a PDF for the customer, and file a copy with the original sale.