7 min read
How to Make a Receipt Template
A guide to building a reusable receipt template — the fixed details to set once, the variable fields to fill each time, and how to reuse it.
- How do I make a receipt template?
- Decide which details stay the same on every receipt — your business name, contact, and logo — and set those once, then leave the date, items, amounts, and receipt number as fields you fill in per sale. Receipt Caker gives you a ready-made structure that does exactly this: your fixed details stay put while you enter the variable ones, so every receipt matches and takes seconds to produce.
Fixed details versus variable fields
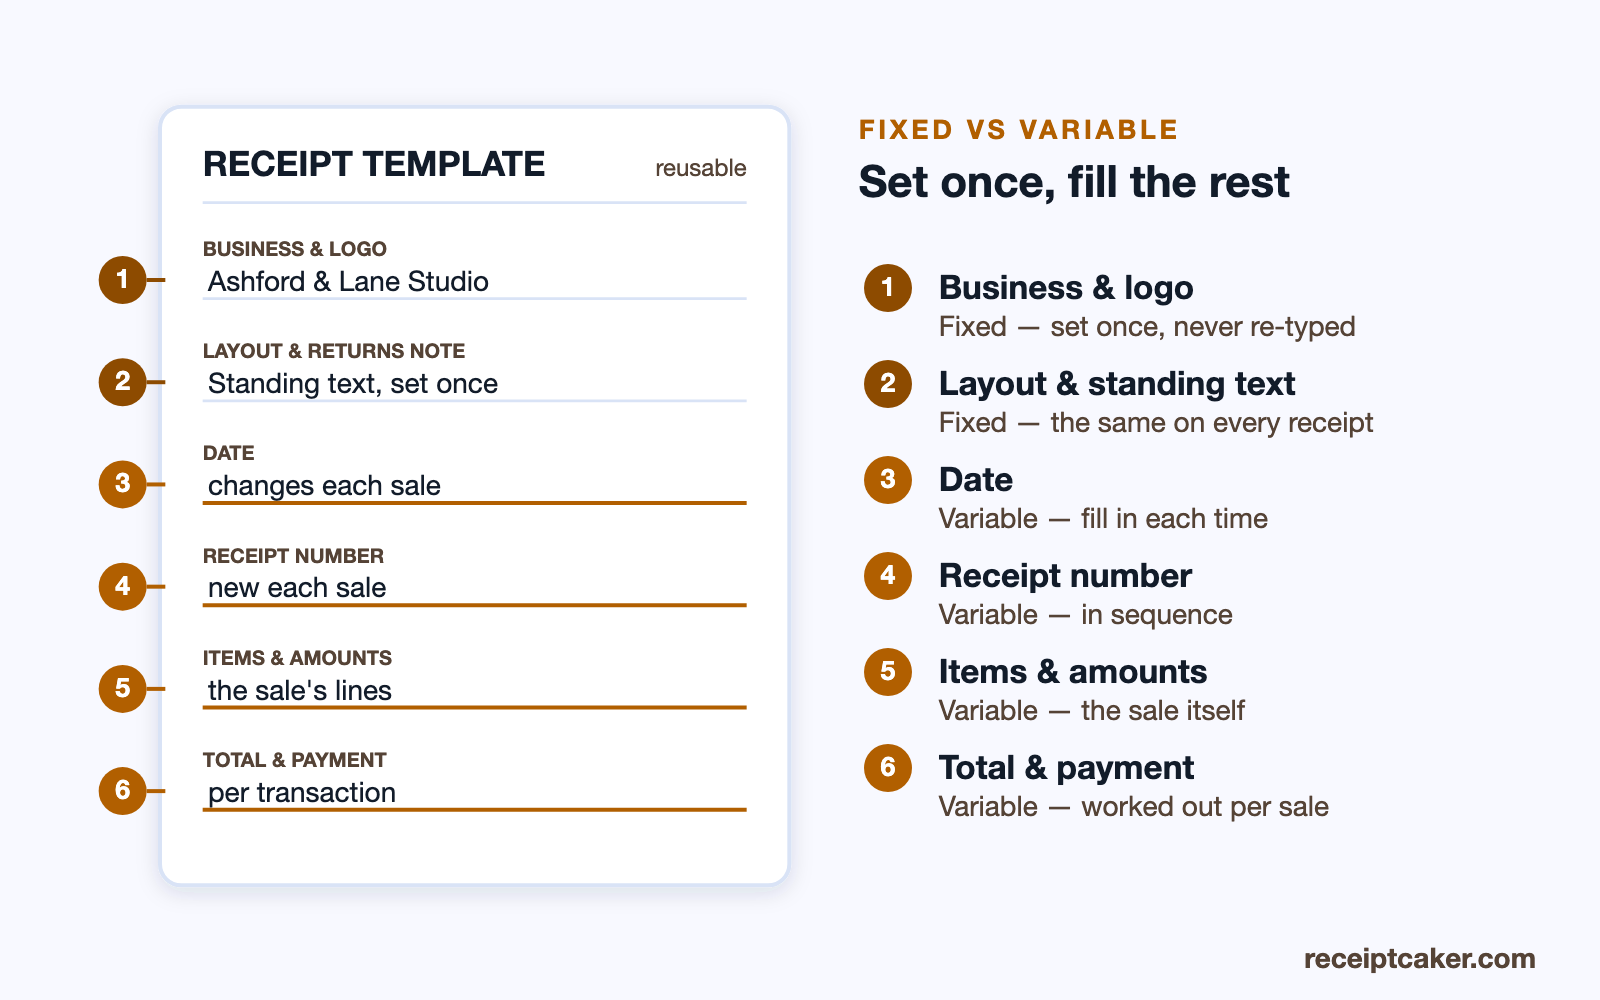
A receipt template works by separating what stays the same from what changes. The fixed parts — your business name, address, contact, logo, and the overall layout — you set once. The variable parts — the date, the receipt number, the items, the amounts, and the payment method — you fill in fresh for each sale. Getting this split right is the whole point of a template.
Setting the fixed details once means you never re-type them or risk a typo creeping into your business name on the tenth receipt. Leaving the rest variable means the template adapts to any sale without being rebuilt. Every receipt then comes out consistent, which is what makes them easy to file and trust.
Choosing the layout
A good receipt layout puts your details at the top, the itemized lines in the middle, and the subtotal, tax, and total at the bottom, with the date and receipt number where they are easy to find. Keep it clean and readable rather than crowded — a receipt is a functional document, and clarity beats decoration.
Decide up front whether you need a tax line, a signature space, or a returns note, and build those into the template so they are there when you need them. Receipt Caker's templates already arrange these fields sensibly, so you can start from a proven structure rather than designing one from a blank page. Starting from a layout that already works also means you are far less likely to omit a field you will later wish you had included, which is a common regret with a template built in a hurry.
Reusing it without rebuilding
The value of a template is realised on the second receipt and every one after. Rather than starting from scratch, you open the template with your fixed details already in place and enter only what changed. This is faster than a blank document and far more consistent than laying each receipt out by hand.
Number your receipts in sequence as you reuse the template, so the record stays ordered and searchable. A generator that holds your details effectively acts as your template — each new receipt inherits the fixed parts and you supply the variable ones.
Where a template saves the most time
A template earns its keep in proportion to how often you use it. Issue a receipt once a year and a blank document is fine; issue several a week and re-typing your business details, rebuilding the layout, and re-checking the totals on each one quickly adds up to real lost time and a real chance of error. The template collapses all of that into filling a few fields.
It also protects consistency at scale. The tenth and the hundredth receipt look exactly like the first, which is what makes a run of them easy to file, quick to reconcile, and credible if anyone reviews them. For a business that means tidy records; for a freelancer it means every client sees the same professional document.
From template to finished receipt
Using the template is the easy part. Open it with your fixed details already in place, enter the date, the items, the amounts, and the next receipt number, and let the tool total the lines and apply any tax. What you have is a finished receipt built from a proven structure, with none of the layout work repeated.
Then export it in the format that suits the moment — a PDF for anything a customer or an accountant will keep, a PNG for a quick share — and save your own copy, named by number and date. Because the template did the structure and the maths, every receipt that comes out of it is uniform and correct, which is the entire reason for building one.
Common template mistakes
A few slips undo the point of a template. The most common is hard-coding something variable — leaving last month's date or a previous receipt number baked into the fixed section, so it silently carries over to the next receipt. Forgetting to include a field you sometimes need, like a tax line or a signature space, means rebuilding the template the first time a sale calls for it. And over-decorating — heavy borders, colours, and graphics — makes the receipt harder to read and slower to print, when clarity is the whole job.
The fix is to be deliberate about the split: put only genuinely unchanging things in the fixed section, give every variable a clear empty field, and keep the design clean. A template built that way keeps working sale after sale without surprises.
One template across every document
The template idea pays off beyond receipts. When your receipts, invoices, and estimates all share the same fixed details and the same clean layout, your paperwork reads as one identity rather than a set of unrelated files — which looks more established to a customer and is easier for you to manage. The fixed section is essentially your brand; reusing it everywhere is what makes the brand consistent.
A generator that holds your details makes this automatic across document types: the same business name, logo, and structure flow into a receipt, an invoice, or an estimate, and you only ever change the specifics of the transaction. That is the same fixed-versus-variable principle applied to your whole set of business documents rather than a single receipt.
Spreadsheet template versus a generator
You can build a receipt template in a spreadsheet or word processor, and for very occasional use that is fine. The drawback is that you have to protect the fixed parts from accidental edits, maintain the tax and total formulas yourself, and manage the layout every time you fill it in.
A dedicated generator removes that overhead: the fixed details are held for you, the maths is automatic, and the layout cannot drift. You get the consistency of a template without the maintenance. Fill in the variable fields, export a PDF or image, and the template does its job — a uniform, professional receipt in seconds.
Steps at a glance
- 1Set your fixed details. Add the parts that stay the same every time — your name, contact, and logo.
- 2Mark the variable fields. Leave the date, items, amounts, and receipt number to fill in per sale.
- 3Choose the layout. Pick a structure that shows items, tax, and total clearly.
- 4Save or reuse it. Keep the template so each new receipt starts from it.
- 5Fill and export. Enter the variable details and export a finished receipt.