7 min read
How to Make a Receipt for Reselling
A guide for resellers on issuing receipts to buyers and tracking your own sales — the fields a resale receipt needs and the fastest way to produce one.
- How do I make a receipt for reselling?
- Add your seller name and contact, describe the item sold with its condition, give the receipt a number and date, and show the price, any tax, and the total paid. Receipt Caker structures these fields and totals them for you, so you can hand a buyer a proper receipt and keep a matching copy as your own record of the sale — download it as a PDF or image.
Why resellers should issue receipts
Whether you flip items, sell on a marketplace, or run a resale shop, a receipt does two jobs at once. It gives the buyer proof of what they bought and from whom, which builds trust and heads off disputes, and it gives you a dated record of the sale for your own income tracking. For a reseller handling many small transactions, that record is what keeps your bookkeeping honest.
A buyer who receives a clean receipt is more likely to buy again and less likely to open a dispute, because they have exactly what they need if a question comes up. It marks you out as a serious seller rather than a casual one.
Describe the item properly
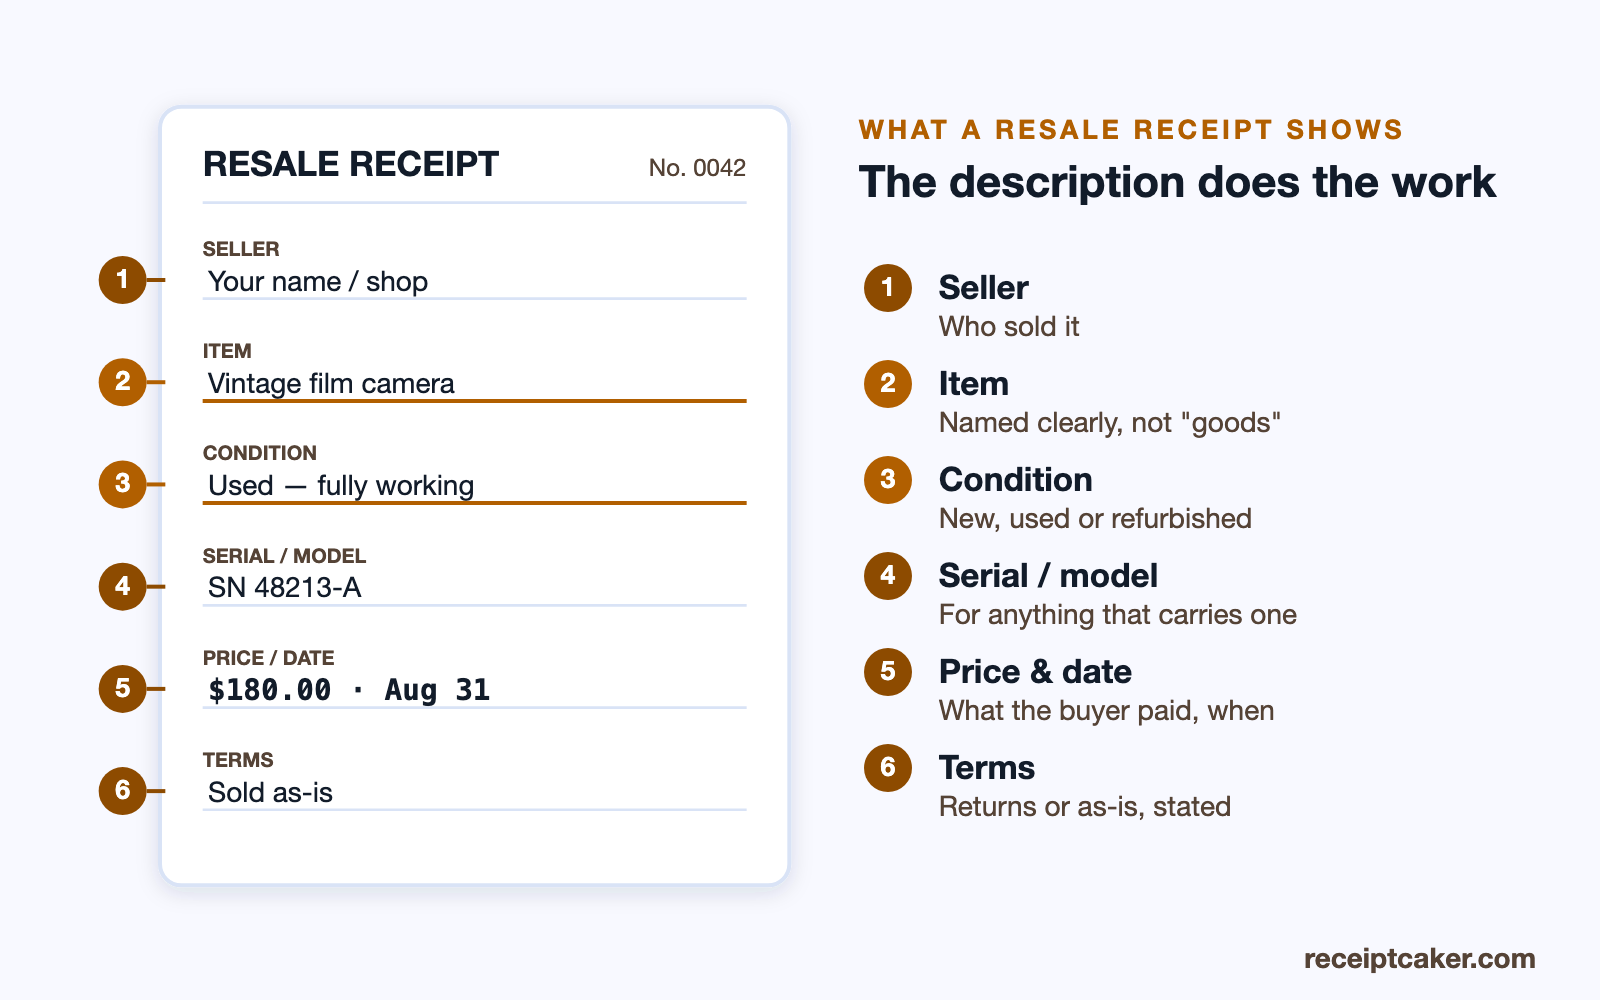
For resale, the item description carries more weight than on an ordinary retail receipt, because condition and identity often matter to the buyer. Name the item clearly and, where it is relevant, note the condition (new, used, refurbished), a model or size, and a serial number for anything that carries one. This protects both sides if the buyer later queries what was sold.
A specific description also supports the buyer's own records — for a warranty, a resale of their own, or an insurance claim. Vague line items like 'goods' help no one, so spend the extra few words getting it right.
Marketplace confirmations vs your own receipt
If you sell on a marketplace, the platform usually emails the buyer an order confirmation, and it is tempting to treat that as the receipt. It is a start, but it is the platform's document, not yours: it rarely captures the condition you described, any as-is or return terms you agreed, or a serial number, and it is tied to that platform's account rather than to your own records. Issuing your own receipt fills those gaps and gives you a copy that lives in your books regardless of which channel the sale came through.
For sales made off-platform — a local pickup, a direct message, a car-boot or garage sale — there is no automatic confirmation at all, so your receipt is the only record either side gets. In both cases a consistent, numbered receipt you control beats relying on whatever each channel happens to send.
Reselling, tax and your cost of goods
Reselling income is taxable once it goes beyond occasionally clearing out your own belongings, and marketplaces increasingly report sellers' sales figures to tax authorities directly. That makes your own records matter more, not less: the receipts you issue document your revenue, and — just as importantly — the receipts for the items you bought to resell document your cost of goods, which is usually deductible against that revenue.
Keeping both sides means you are taxed on your actual profit rather than your gross sales. A reseller who saves the purchase receipt for every item flipped, alongside the sale receipt, can show the margin on each one. In the US the IRS can generally look back three years, so hold those records at least that long; whether a given activity counts as taxable trading is set by your local rules, so check what applies to you.
Keeping your sales record
Reselling income is still income, and in most places you are expected to keep a record of your sales for tax. Issuing a numbered receipt for each sale and filing a copy means your income is itemised and dated as you go, rather than reconstructed at year end from marketplace payout reports and memory.
Run the receipts in sequence so you can spot a gap and total your sales for a period easily. A folder of PDFs named by number and date is enough, and it reconciles cleanly against the payouts that land in your account. Whether a particular resale activity is taxable, and what records you must keep, is set by your tax authority — check the rule that applies to you.
Spell out returns and as-is terms
Resale often means used or one-of-a-kind items, so what happens if the buyer is unhappy matters more than in ordinary retail. If a sale is final, say so: a short 'sold as-is, no returns' line on the receipt sets the expectation in writing and heads off a later dispute. If you do accept returns, state the window and any condition, so both sides know where they stand.
Putting the terms on the receipt itself, rather than leaving them to memory or a marketplace's default policy, is what makes them stick. It protects you against a buyer claiming an item was misdescribed, and it protects the buyer by recording exactly what you promised at the point of sale.
A quick reseller workflow
Because you issue many similar receipts, a little setup pays off. Save your seller details once, then for each sale you only enter the item description, its condition, and the price — the tool numbers the receipt, works out any tax, and exports it in seconds. Send it with the shipment or the item, and file your copy in the same move.
Kept up consistently, this turns a stream of individual flips into an ordered set of records. At the end of a period your sales are itemised and dated, your costs are filed alongside them, and working out what you actually made is a matter of totalling two folders rather than trawling through marketplace payout reports.
Making a resale receipt fast
You are likely issuing several receipts a week, so speed matters. A generator that holds your seller details lets you enter just the item and price per sale, works out the total and any tax, and exports a finished receipt in seconds to send with the item or the shipment. That speed is what makes it realistic to give every buyer a receipt rather than only the ones who think to ask.
Fill in the fields, download a clean PDF or image, and keep the copy. Because it all happens in your browser, your buyer and sales details are not uploaded anywhere. Issue the receipt only for genuine sales that actually took place — it is a record of real trade, not a document to fabricate.
Steps at a glance
- 1Add your seller details. Put your name or shop name and a contact so the buyer knows who they bought from.
- 2Describe the item. Name the item clearly, with condition or a serial number if it matters.
- 3Number and date the sale. Give the receipt a number and the date of the sale.
- 4Show the price and total. State the price, any tax, and the total the buyer paid.
- 5Export and keep a copy. Download the receipt for the buyer and file a copy as your income record.